前言:
博客页面总不好看所以没心情记录?本站同款美化教程来了!
- 精心挑选一下午选择了自己觉得最好看的博客主题——butterfly,可以看看github官网的预览看看是否喜欢再浏览教程
- 仅添加了部分个人觉得实用的功能(搜索、评论、菜单、留言板),如有其他需要(看板娘、站点统计等),可留言
- 考虑到可能因为主题更新带来的未知影响,请修改前务必备份,完成一个功能点之后务必核对是否生效或异常,以便排查恢复
- 配置使用的.pug、.styl、.yml皆以缩进表示所属关系和代码块的所属范围,编辑时请注意缩进
本文仅介绍美化,搭建个人博客教程见hexo+github搭建个人博客
主题配置
未说明更改即为默认配置即可,感兴趣可以研究,大部分配置都有英文说明和配置选项,可以修改后比对效果
主题引用
在hexo根目录打开cmd命令行
$ git clone -b master https://github.com/jerryc127/hexo-theme-butterfly.git themes/butterfly
|
后续更新,在主题目录下运行(建议先备份)
在hexo根目录打开cmd命令行
$ git clone -b master https://gitee.com/immyw/hexo-theme-butterfly.git themes/butterfly
|
后续更新,在主题目录下运行(建议先备份)
修改hexo根目录下的_config.yml中的theme改成butterfly即引用成功,可以本地查看下博客页面变化
配置修改
将主题配置文件themes/butterfly/_config.yml复制一份重命名为_config.butterfly.yml并移动到hexo根目录,hexo会优先生效根目录的配置,同时防止更新butterfly时配置被覆盖。
文章中的图标可以在Icons | Font Awesome找到
严格遵循两空格对齐,必须是/xxx/,后面||分开,然后写图标名。可以使用||和空格缩进表示下拉菜单:
menu:
  首页: / || fas fa-home
  找文章 || fas fa-book:
    分类: /categories/ || fas fa-code-branch
    标签: /tags/ || fas fa-tags
    归档: /archives/ || fas fa-calendar-check
  资源 || fas fa-folder:
    分享: /share/ || fab fa-slideshare
    书籍: /books/ || fas fa-book-open
  留言板: /comments/ || far fa-clipboard
  关于: /about/ || fas fa-heart
|
butterfly已经提供了部分菜单页面,对于添加的其他页面需要在hexo根目录执行
代码Code Blocks
highlight_theme:代码高亮主题,推荐使用mac light
highlight_copy:复制按钮,建议为true
highlight_lang:显示代码语言,建议为true
highlight_shrink:true默认不显示代码,需要点>打开;false默认显示,可关闭;none表示一直显示
highlight_height_limit:高度限制,像素值
code_word_wrap:代码自动换行,开启该功能需要修改hexo根目录_config.yml文件line_number为false
复制copy
博客内容被复制时添加版权信息
enable设置为true开启
limit_count表示复制字数超过多少时生效
社交图标social
采用图标: 链接 || 描述的格式书写:
fab fa-github: https://github.com/XXXX|| Github
fas fa-envelope: mailto:XXXXX@XXXX || Email
fa fa-book: https://www.XXXXX
搜索功能search
推荐使用algolia_search,hits为显示结果数量
开启后需要配置相关参数到_config.yml,首先在algolia官网注册账户,然后打开setting-API Keys-All APIKeys,选择New API Key添加一个新的,ACL都选上,其他看自己需要就行。
按照以下格式填入_config.yml
algolia:
  appId: "XXXXXXXXXX"
  apiKey: "xxxxxxxxxxxxxxxxxxxxxxxxxxxxxxxx"
  adminApiKey: "xxxxxxxxxxxxxxxxxxxxxxxxxxxxxxx"
  chunkSize: 5000
  indexName: "xxxxxxxx"
  fields:
    - content:strip:truncate,0,500
    - excerpt:strip
    - gallery
    - permalink
    - photos
    - slug
    - tags
    - title
    - categories
|
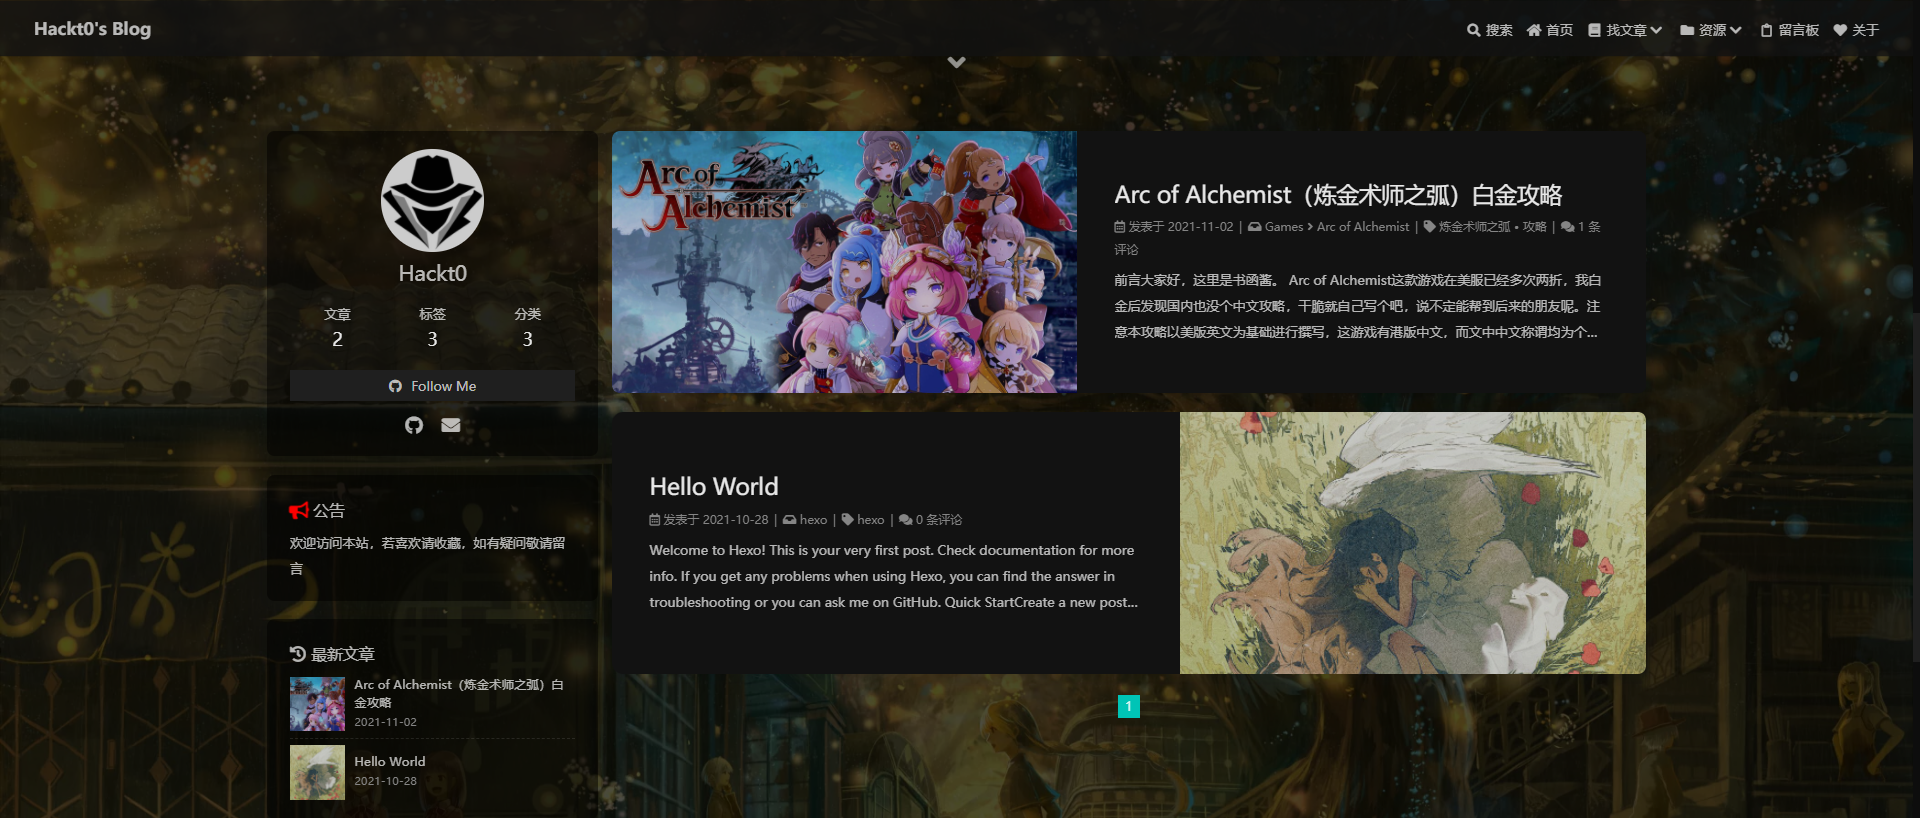
图片设置Image
favicon: 网站图标
avatar: 头像 effect开启/关闭旋转功能
disable_top_img: 开启/关闭页顶图片
index_img: 主页背景图片
default_top_img: 未设置时显示的默认页顶图片
archive_img: 归档页面页顶图片
tag_img: 标签页面页顶图片
tag_per_img: 可以以format格式指定不同标签页顶图片
category_img: 分类页面页顶图片
category_per_img: 可以以format格式指定不同分类页顶图片
cover: 文章封面缩略,除default_cover(默认封面)外不建议修改
error_img: 替换无法显示的图片
error_404: 页面访问错误时默认页面
文章简介index_post_content
method: 1-只显示描述
2-描述存在时显示描述,否则自动提取
3-始终自动提取
false-不显示
length: 当指定显示方式为2或3时需要指定自动提取长度
文章设置Post
toc: 主页目录
post_copyright: 文章底部版权声明
reward: 打赏,添加二维码即可
关联文章related_post
文章下方关联文章推荐
文章过期提醒noticeOutdate
设置文章超过limit_day天数后添加提示可能会不适用于现在版本
推荐使用twikoo,搭建流程可参考Twikoo 中文文档,然后配置对应评论参数即可,如twikoo填入即可
twikoo:
envId: xxxxxx-xxxxxxxxxxxxxxx
region:
visitor: false
option:
美化Beautify/Effect
css/js代码插入inject
美化部分配置中说明较为充分,不作解释,重点说一下怎么引用css和js文件;
建议创建一个目录专门存放自己的css文件,即可以引用网上的现成的文件,也可以引用本地文件:
inject:
head:
- <link rel="stylesheet" href="https://cdn.jsdelivr.net/gh/sviptzk/HexoStaticFile@master/Hexo/css/custom.min.css">
- <link rel="stylesheet" href="https://cdn.jsdelivr.net/gh/HCLonely/images@master/others/heartbeat.min.css">
- <link rel="stylesheet" href="/mycss/xxxx.css">
bottom:
- <script src="/myscript/xxxx.js"></script>
|
以下仅针对于我做的部分css美化说明:
修改字体
@font-face{
font-family:'HackFont' ;
src:url('/fonts/ZhuZiAWan.woff2');
font-display : swap;
}
*{
font-family: 'HackFont', sans-serif;
}
|
透明效果
#footer{
opacity: 0.5;
}
#footer{
background: transparent!important;
}
#page-header{
background: transparent!important;
}
#page-header.post-bg:before {
background-color: transparent!important;
}
[data-theme="dark"]
#footer::before{
background: transparent!important;
}
[data-theme="dark"]
#page-header::before{
background: transparent!important;
}
[data-theme="dark"]
#web_bg{
background: url(/img/darkmode.webp);
background-position: center !important;
background-size: cover !important;
background-repeat: no-repeat !important;
}
#web_bg{
background: url(/img/lightmode.jpg);
background-position: center !important;
background-size: cover !important;
background-repeat: no-repeat !important;
}
[data-theme="dark"]
#aside-content .card-widget{
background: rgba(0, 0, 0, 0.5)!important;
}
[data-theme="dark"]
div#post{
background: rgba(0, 0, 0, 0.5)!important;
}
|
阅读模式背景
.read-mode #body-wrap{
background: rgba(186, 167, 139, 0.5);
background-position: center !important;
background-size: cover !important;
background-repeat: no-repeat !important;
}
[data-theme="dark"]
.read-mode #body-wrap{
background: rgba(0, 0, 0, 0.5);
background-position: center !important;
background-size: cover !important;
background-repeat: no-repeat !important;
}
|
标题风车效果
h1::before, h2::before, h3::before, h4::before, h5::before, h6::before {
-webkit-animation: ccc 1.6s linear infinite ;
animation: ccc 1.6s linear infinite ;
}
@-webkit-keyframes ccc {
0% {
-webkit-transform: rotate(0deg);
transform: rotate(0deg)
}
to {
-webkit-transform: rotate(-1turn);
transform: rotate(-1turn)
}
}
@keyframes ccc {
0% {
-webkit-transform: rotate(0deg);
transform: rotate(0deg)
}
to {
-webkit-transform: rotate(-1turn);
transform: rotate(-1turn)
}
}
#content-inner.layout h1::before {
color: #ef50a8 ;
margin-left: -1.55rem;
font-size: 1.3rem;
margin-top: -0.23rem;
}
#content-inner.layout h2::before {
color: #fb7061 ;
margin-left: -1.35rem;
font-size: 1.1rem;
margin-top: -0.12rem;
}
#content-inner.layout h3::before {
color: #ffbf00 ;
margin-left: -1.22rem;
font-size: 0.95rem;
margin-top: -0.09rem;
}
#content-inner.layout h4::before {
color: #a9e000 ;
margin-left: -1.05rem;
font-size: 0.8rem;
margin-top: -0.09rem;
}
#content-inner.layout h5::before {
color: #57c850 ;
margin-left: -0.9rem;
font-size: 0.7rem;
margin-top: 0.0rem;
}
#content-inner.layout h6::before {
color: #5ec1e0 ;
margin-left: -0.9rem;
font-size: 0.66rem;
margin-top: 0.0rem;
}
#content-inner.layout h1:hover, #content-inner.layout h2:hover, #content-inner.layout h3:hover, #content-inner.layout h4:hover, #content-inner.layout h5:hover, #content-inner.layout h6:hover {
color: #49b1f5 ;
}
#content-inner.layout h1:hover::before, #content-inner.layout h2:hover::before, #content-inner.layout h3:hover::before, #content-inner.layout h4:hover::before, #content-inner.layout h5:hover::before, #content-inner.layout h6:hover::before {
color: #49b1f5 ;
-webkit-animation: ccc 3.2s linear infinite ;
animation: ccc 3.2s linear infinite ;
}
#rightside_config i.fas.fa-cog.fa-spin {
animation: fa-spin 5s linear infinite ;
}
|
文章设置
在hexo根目录下打开命令行,执行以下命令创建新文章
执行完之后即可在source/post目录下看到对应md文件,文件---分割的地方就是Post Front-matter
支持以下选项
| 关键字 |
说明 |
| title |
【必要】页面标题 |
| date |
【必要】创建日期 |
| type |
【非必要】标签、分类和友情链接三個页面需要配置 |
| updated |
【非必要】更新日期 |
| description |
【非必要】缩略图展示的描述 |
| keywords |
【非必要】页面关键字 |
| comments |
【非必要】是否展示评论模块,默认true开启 |
| top_img |
【非必要】页顶图片 |
| mathjax |
【非必要】mathjax的per_page: false时,才需要配置,默认false) |
| katex |
【非必要】katex的per_page: false时,才需要配置,默认false) |
| aside |
【非必要】侧边栏显示 (默认true开启) |
| highlight_shrink |
【非必要】代码是否直接展开(默认为highlight_shrink的配置) |

 微信
微信 支付宝
支付宝